Building/deploying Jekyll and Hugo sites via GitLab CI
This post is part of a series: CI for static site generators
- Setting up CI for this site with Bitbucket Pipelines and SSH
- Building and deploying a Jekyll site via GitHub Actions
- Building/deploying Jekyll and Hugo sites via GitLab CI (this post)
After auto-deploying Jekyll sites via Bitbucket Pipelines and GitHub Actions, I wanted to try the same thing via GitLab CI as well.
I had one more Jekyll site in a private Mercurial repository which I needed to move off Bitbucket anyway, so I converted it to Git and pushed it to GitLab (already last year).
Plus, I wanted to try Hugo as an alternative to Jekyll, mainly because of speed (Jekyll builds are slow). I already wrote about that here - my actual test site (not the demo I linked in the post) is in another private GitLab repo, for which I wanted to setup CI as well.
Prerequisites
Exactly like the repos used in the previous posts, most of the “build and deploy logic” of the existing Jekyll site was in two shell scripts, and I used the same pattern for the Hugo test site as well:
ci-build.shexecutes Jekyll/Hugo to build the site from source, zips the result and saves that file as a GitLab CI build artifactci-deploy.shunzips the site and copies it to the right directory on the webserver- GitLab CI creates a SSH connection to the webserver and executes ci-deploy.sh directly on the webserver
For a more thorough explanation of all this, please read the two previous posts.
In this post, I’ll focus on the GitLab-specific things.
Part 1A: Building the Jekyll site
Similar to Bitbucket Pipelines, GitLab CI has the possibility to specify a Docker image, which will then execute the actual build.
Here’s the relevant part of .gitlab-ci.yml:
build:
  only:
  - master
  stage: build
  image: jekyll/builder
  script:
  - chmod +x ci-build.sh
  - ./ci-build.sh
  artifacts:
    paths:
    - build
    expire_in: 1 week
… and here’s ci-build.sh:
#!/bin/bash
jekyll build
if [ $? -ne 0 ]
then
  exit 1
fi

mkdir build

tar -czvf build/build.tar.gz -C _site .
The build dir created by the shell script is saved by GitLab CI as an artifact (because it’s needed later for the deploy step), but expires after a week (because we don’t need it anymore as soon as it’s deployed).
Part 1B: Building the Hugo site
Same as Jekyll…except that we’re using the monachus/hugo image, which is like jekyll/builder, but for Hugo:
.gitlab-ci.yml:
build:
  only:
  - master
  stage: build
  image: monachus/hugo
  script:
  - chmod +x ci-build.sh
  - ./ci-build.sh
  artifacts:
    paths:
    - build
    expire_in: 1 week
And ci-build.sh:
#!/bin/bash

cd web
rm -r _site
hugo
if [ $? -ne 0 ]
then
  exit 1
fi
cd ..

mkdir build
tar -czvf build/build.tar.gz -C ./web/_site .
Part 2: Deploying to the webserver via SSH
From a “how difficult to get to work” perspective, GitLab is somewhere in the middle.
It wasn’t as easy as Bitbucket, where you just need to paste your SSH key into a web UI, and the actual SSH voodoo happens automagically in the background.
Similar to GitHub Actions, GitLab CI needs a few lines of script in the .yml to set up SSH, but at least they have a complete working example in the docs which you just need to copy & paste.
At the time of writing this post, it was:
before_script:
  - 'command -v ssh-agent >/dev/null || ( apt-get update -y && apt-get install openssh-client -y )'
  - eval $(ssh-agent -s)
  - echo "$SSH_PRIVATE_KEY" | tr -d '\r' | ssh-add -
  - mkdir -p ~/.ssh
  - chmod 700 ~/.ssh
This assumes a Debian-based image, but I’m using Linux Alpine, so I needed to modify the apt-get part because I already knew from setting up CI in Bitbucket that in Alpine, apt-get is apk.
For both Jekyll and Hugo, I’m using this section in .gitlab-ci.yml:
deploy:
  only:
  - master
  stage: deploy
  image: alpine
  before_script:
  - apk update && apk add openssh-client git openssh rsync
  - eval $(ssh-agent -s)
  - echo "$SSH_PRIVATE_KEY" | tr -d '\r' | ssh-add -
  - mkdir -p ~/.ssh
  - chmod 700 ~/.ssh
  - ssh-keyscan $DOMAIN >> ~/.ssh/known_hosts
  - chmod 644 ~/.ssh/known_hosts
  script:
  - rsync -rSlh --stats build/ ssh-$WEB_USER@$DOMAIN:$WEBPATH
  - ssh -o StrictHostKeyChecking=yes ssh-$WEB_USER@$DOMAIN 'bash -s' -- < ci-deploy.sh $WEBPATH
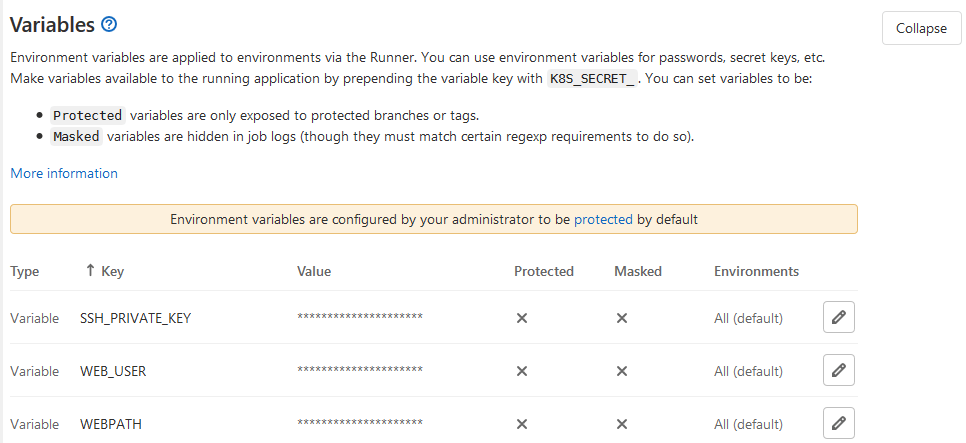
Similar to Bitbucket and GitHub, the variables are coming from the repository’s CI settings on GitLab (https://gitlab.com/USERNAME/REPO/-/settings/ci_cd#js-cicd-variables-settings):
$DOMAIN is a “local variable” coming from my .gitlab-ci.yml (I didn’t want to put it as a variable into the settings, because it is not really secret):
variables:
  DOMAIN: example.com
And ci-deploy.sh is the same for Jekyll and Hugo:
#!/bin/bash
rm -rf $1/tmp
mkdir $1/tmp
tar -xzvf $1/build/build.tar.gz -C $1/tmp
rsync -Pav --delete $1/tmp/ $1/web
Final thoughts
So far, that was the last part of my “deploy static sites with CI provider X” series - now I’ve tried it with all providers I wanted to try :-)
In the end, it probably doesn’t matter which one you use.
If you’re a Shell/SSH newbie like me, you’re spending most of the time figuring out that part…no matter which provider you’re using.
And once you figured it out and need to deploy another site using the same CI provider, it’s mostly copy & paste.

